Friday, February 29, 2008
Happy Birthday Western Sky Card
Here is another Tent Card with the Western Sky Designer Series Paper (page 170) in the Stampin' Up! Idea Book. I used the same directions as yesterday's blog but I just changed the background paper around. I used a stamp from Boho Backgrounds (page 109) and then used the Scallop Punch to punch around the stamp. Then I stamped with Soft Sky card stock a stamp from One of a Kind (page 109). I punched that out with the 1" circle and then put them together with a brad from the Silver Hodgepodge Kit (Mini Occasions). This kit is so awesome! I put a piece of Blue Bayou card stock between the seams of the two papers. It just seems to need ribbon or card stock between the two colors. I stamped Happy Birthday from Its Your Birthday Set (another stamp set I use so often-page 141) with Blue Bayou ink on Soft Sky card stock. A frame and 2 silver brads were added from the Silver Hodgepodge Kit. This Designer Paper is so much fun to play with. I am going to experiment with some more colors today after I get back from running errands.
Thursday, February 28, 2008
Western Sky Cards
I cut this Tent Card of Blue Bayou card stock 8 1/2 by 4 1/4. I scored it at 4 1/4. The DPS is from Western Sky. You can cut this paper in any length you want. I cut this one at 1 1/2 inches and then turned it over to put on the bottom of the card. I added Blue Bayou stictched ribbon and put it through the new Silver Hodgepodge. This new Silver Hodgepodge Kit will be coming out on Saturday, March 1st! It is to die for! So many awesome pieces and the brads are fantastic! I stamped with Blue Bayou on Whisper White card stock and then put a silver star brad through the scallop! I attached the brad near the top of the card so it sticks out over the card. The card will stand straight up like a tent and with the little scallop at the top it will still fit in a regular envelope. I stamped Happy Birthday on it in Blue Bayou. This stamp is in the Birthday saying set. Come back tomorrow and view another card only using more Silver Hodgepodge. I love these embellishments!!
Wednesday, February 27, 2008
3 x 6 cards
You can make 4 cards out of one sheet of 12 x 12 card stock. Cut the card stock in 1/4's to get the four cards. I then scored the cards in the middle and added a piece of DPS (oh so many choices) I made the DSP 5 3/4 x 2 and added it to the bottom or top of the card stock. The flowers on the orange card are from the new Occasions Mini (Die-cut Blooms 11376) You get 1 sheet (12 x 12 sheet) each of die cut, textured flowers in 4 colors: Bashful Blue, Old Olive, Pumpkin Pie, and Real Red. They come in a variety of sizes. They also work great with the Rub Ons (111277) for 10.95. The Pumpkin Pie card also has a Build a Brad and some Pumpkin Pie Striped Grosgrain Ribbon. I also added a Rub On the the bottom right which is difficult to see.
The Regal Rose card with the Bashful Blue flower also uses the stamp set from Sale-a-bration "So Many Scallops". I punched out Sweet One with the 1 3/8 punch and also added the Bashful Blue Striped Grosgrain Ribbon. The other Regal Rose card has Wild Wasabi Striped Grosgrain Ribbon with the So Many Scallops stamp. I used the Scallop Punch and punched a scallop from Wild Wasabi and offset it under the Sweet One. I also added some Dimensionals to make it stand out a little. You can use so many different kinds of Designer Papers to add to these 3 x 6 cards. Enjoy making these quick cards!
Tuesday, February 26, 2008
Kick Stand Card
Good morning! (Actually I guess it is afternoon) I am a little late posting today-guess we were outside a long time this morning! Today I am going to be posting a Kick Stand card. You cut the Brilliant Blue card stock 4 1/4 x 11. Then you cut 1 1/4 inches off of the bottom of the card. I added 4 x 4 1/4 Brilliant Blue Designer Paper on the front top of the card and then adhesived a 4 1/4 by 5 1/2 piece of Jersey Shore DPS on the inside of the card. I added the new Pumpkin Pie Striped Grosgrain Ribbon and a Scallop from Pumpkin Pie card stock. Cheers to You was stamped with Brilliant Blue on a circle of white card stock. This stamp set is from the Sale-a-bration set. You must put the scallop on so it is even with the bottom of the back of the card so it will stand up. These cards are very quick to make. Enjoy making these cards with all kinds and colors of DPS and the scalloped phrases!!! You can also put different shapes in place of the scallops as rectangles, squares, etc.
Monday, February 25, 2008
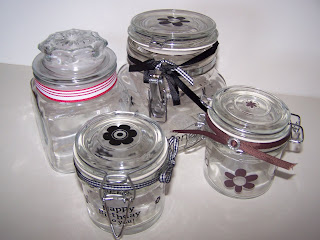
Rub Ons on Glass
Good morning everyone! We are getting a little moisture today so that is always good! I made a few rub ons on glass to show you how easy it is. Some of the rub ons are from the new Occasions catalog that will be out on March 1st. This mini is a delight! I tried showing you all angles of these jars. I have also added some ribbon around the tops of the jars. On the brown jar I put the new poly-twill ribbon (Occasions mini) and also added a piece of hardware from the Styled Silver Hodgepodge Hardware Kit. The small glass jar would be great filled with black jelly beans, black licorice or anything for a 30th, 40th Birthday Celebration! I also added the rub ons on the top of the jars to complete the project! I hope you can have as much fun with these rub ons as I do!
Sunday, February 24, 2008
Easter Basket Idea
Sorry! I have been away for a few days! We had a great sister reunion in Loveland, CO! We spent so much time laughing and talking. We just need to get together more often. These are pictures of quick Easter baskets I made with the rub ons. I bought 4 little buckets from Hobby Lobby and put rub ons from Stampin'Up! on them. Then I added some Easter grass, bubbles, and some odds and ends of candy to complete the baskets. These rubs ons are great for scrapbook pages, cards, any type of glassware and metal. I also used the rub ons on picture frames and or on the glass of the frame. The rub ons with the four colors of brown, black, olive and white are one of the free Sale-a-bration gifts through March 17th if you order $50.00 of merchandise.
Thursday, February 21, 2008
Notepads
These are some notebooks I have been making for fun the last few days. I got the idea from Rochelle's blogspot at impressionsbyrochelle.blogspot.com. You can buy the notepads at Walmart in packages of 3. They are the AM pads with the green band on the top.
Directions for the horse notepad: Cut chocolate chip card stock 5 1/2 x 10 1/2. Score at 8 1/4 and 8 1/2. The Close to Cocoa mat is 5 1/4 x 8 1/8. Glue the Close to Cocoa mat on the back of the notepad, then glue the Close to Cocoa mat to the Chocolate chip card stock next to the 8 1/4 score line. For the image piece--the Close to Cocoa piece is 5 1/4 x 1 3/4 and the Soft Sky piece is 5 1/8 x 1 5/8. Stamp on the Soft Sky with Close to Cocoa horses from the Wanted Stamp Set. Some of the notepads I just used the Designer Series Papers that will be available soon from the Ocassions catalog.
Wednesday, February 20, 2008
Patti's Western Shirt
This is the last two scrapbook pages of Patti's challenges. She has used the Outlaw Scrapbook Kit, Wanted Stamp Set, Build A Brads, and many embellishments. Note how she has the actual pockets on the shirt along with the collar.
I have taken a picture of each page and then I took a picture of the pages side by side so you could see what they would like in a scrapbook.
At the February club meeting I made a scrapbook page and then I gave each member a challenge sample to see it they could make a page by the club meeting in March. I will be glad to take a picture and publish everyone's scrapbook page.
Thank you so much Patti for sharing your talent with us!
Together Scrapbook Page
Patti's Western Cards
Here are the western cards that Patti has donated to the Jaycie fund. They are all made from western sets. Some of them used the Outlaw paper and the Western Scrapbook Kit.
As you can see in the top pictures there are cards using the Bronco set and some of the retired western sets. She has also used the Scallop Punch and many DSP (designer series papers).
I also made small groups of her cards so you could see them better and then I put them all together in a group. I love the variety of colors and stamps. Patti also chalked a lot of the cards.
Theresa's Donation
Theresa has been sooo very generous for the silent auction for Jaycie. She has donated about two dozen cards using various stamp sets. She has used some retired sets and some current stamp sets-note the Pun Fun set.
Check out the different backgrounds she has used. All of the cards that she has made uses a piece of card stock 5 1/2 x 4 1/4 with rounded corners. On the top of each piece of cardstock she has made another folded card with a design on it.
I have attempted to divide the cards into smaller groups so you can get a closer look at each one of the cards. You can also use the oval punch to punch out the sayings! This is much easier than cutting around each word! Right, Theresa?
Patti's Western Scrapbook Page
This page was made from some of the paper in the Outlaw Scrapbook Kit. You can also see some of the stamps from the Wanted stamp set. She has also used the Scalloped Punch, hardware from the Hodgepodge kit, and some stitched ribbon. This page was alot of work but well worth the time! Patti, another nice page!
Patti's Baby Book
Cards from Kristina
Thank you so much Kristina for the lovely cards for Jaycie. I wasn't able to publish all of them individually as I couldn't get a clear picture of some of them. Kristina loves the Doodle stamp set so she would have to put one of these cards in!!!!
Here is another card with the Doodle Set! Note how bright her cards are!
This is a picture of all of the cards that
Kristina sent! Note the card that is crisscross-what a cool fold! It is also using the new felt flowers with the DSP of Bali Breeze!
Note the little lady bug on the envelope!
Thank you Kristina for all the cards!
Tomorrow I will post some awesome scrapbook pages and also some more cards for Jaycie that I have received!
Love Scrapbook Pages
We made this scrapbook page at February stamp club. I used a 12 x 12 piece of white card stock. I added paper from the Brilliant Blue Designer Paper and Brilliant Blue card stock. The flower is from the Pretties Kit and we traced around the alphabet chip board for the letters, l,v and e onto white card stock. A half
pearl was added in the middle of the flower. The next page is using the same layout except for different colors. The DPS was taken from the Crew Kids Girl Kit. The letters were the same except for the O was made from the Wasabi scalloped punch and a circle punch. It is interesting how you can get such a different look by using different colors.
All Sale-a-bration Sets in One Gift
I have made 6 cards using the Sale-a-bration sets and put them in a square 8 ounce tin. The cards are all cut 5 x 2 1/2 which after folded make a 2 1/2 inch square and will fit in the tin. I tried to show different techniques on each card and using embellishments. Of course, I had to use the scalloped punch! You can not see it real well but I used the new fine glitter on the cake card along with the black brads. On the Merci card (butterfly) I used watercolor paper and then on the sides I used the paper piercer from teh Crafter's Tool Kit along the sides. Then I took the white gel pen and drew V's from hole to hole to make it look like I had sewn it. The black card used the Have and To Hold stamp set with some glitter on the glasses. I used the black Rub Ons from Sale-a-bration on the red grosgrain ribbon.
Nursery Necessities Baby Card
Subscribe to:
Posts (Atom)